
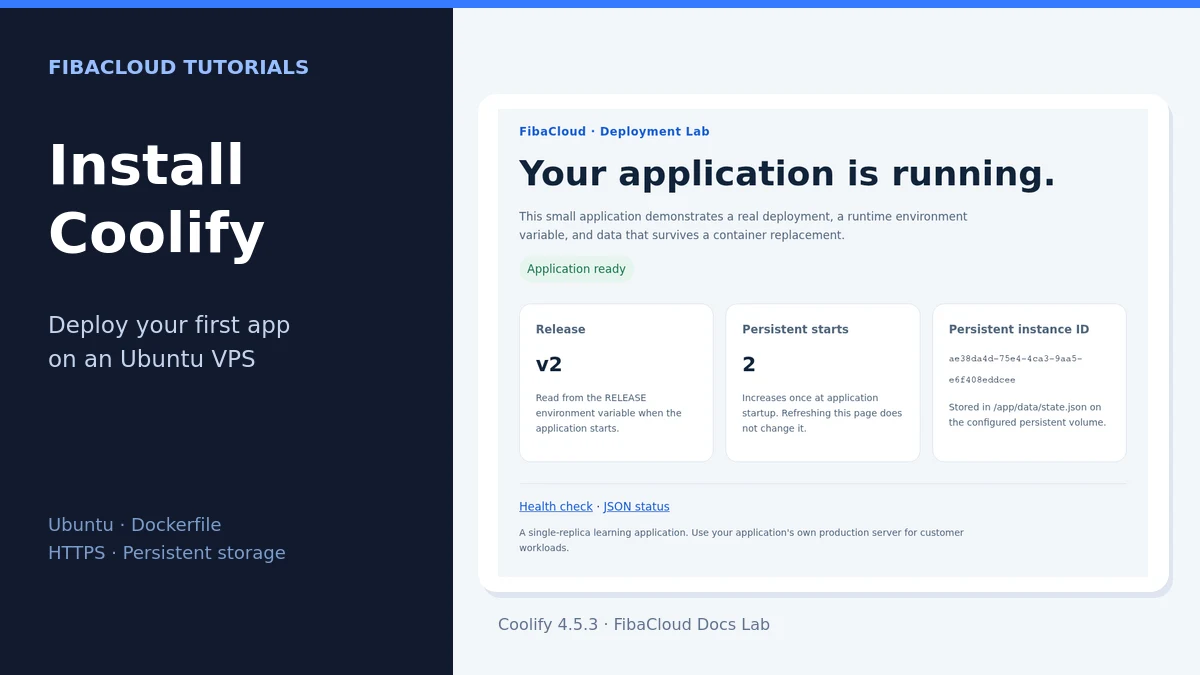
Coolify gives you a web interface for deploying applications on your own server. You can manage Docker applications, domains and deployments from the same place. In this guide, you will install it on a clean Ubuntu VPS and publish a small web app, then work through HTTPS, runtime configuration, persistent storage and backups.
The example needs neither a Git account nor a paid API. You will change the release value shown in the browser, redeploy the app and check that its data survives the replacement container. That gives you a first deployment you can inspect and maintain.
Test environment and prerequisites
The clean VPS used for this guide runs Ubuntu 24.04.5 LTS (amd64), with 2 vCPUs and a 4 GB memory plan. The operating system reports approximately 3916 MiB of RAM; the 80 GB plan disk provides a filesystem of about 76.45 GiB.
| Component | Version used in this guide |
|---|---|
| Coolify | 4.5.3, verified in the interface and running container. |
| Example application | Official Alpine image containing Python 3.13.18, pinned by digest in the Dockerfile. |
| Docker and Compose | Docker Engine 29.9.2 / Docker Compose 5.6.1. |
The installation and first application deployment ran on 31 October 2026. We used the owner registration, HTTPS panel and Dockerfile deployment, then verified trusted TLS, the health check and data-directory permissions.
A replacement container was also tested after changing RELEASE: v1 → v2, the same persistent identity and a startup count change from 1 to 2.
The control-plane database and application volume were backed up and restored separately on the same VPS. The application continued responding during panel recovery; application-data recovery returned the original identity and preserved permissions. These recovery tests cover the same server.
Coolify’s official installation page lists a minimum of 2 CPU cores, 2 GB RAM and 10 GB of free disk space. Builds and databases running on the same machine can require more. These requirements do not establish a particular concurrent-user or application capacity.
- A clean Ubuntu VPS with SSH and administrative access. Start with our guide to connecting to a remote server over SSH if needed.
- Panel and application subdomains pointing to the VPS’s public IP. The examples use
coolify.example.comandapp.example.com; replace them with your own domains. Any AAAA record must point to the correct IPv6 address. - Available 80/TCP and 443/TCP ports for HTTP and HTTPS. Check both the host firewall and any provider firewall.
- The ability to open an SSH tunnel from your computer for the first owner registration.
The official installation recommends a fresh server. Do not stop services on an existing cPanel, Plesk, Apache or Nginx host just to free its ports: that can interrupt working sites. This guide uses a VPS dedicated to Coolify and the example application.
What Coolify and the example app will do
| Component | Purpose | What to keep in mind |
|---|---|---|
| Coolify | Manages projects, server access and deployments. | It is a privileged control plane. Protect the panel account and the SSH keys it uses to operate servers. |
| Reverse proxy | Routes domain traffic to an application and handles HTTPS. | HTTPS does not add a login system to the application. |
| Example app | Shows a release value, persistent identity and startup count. | This is a small functional example, not a capacity benchmark or a ready-made customer app. |
| Persistent volume | Keeps the app’s data separate from the container. | Keeping a volume on the server does not give you an independent backup. |
This workflow puts a Dockerfile directly into Coolify. Git integration, automatic deployment after a push and multiple deployment servers are separate workflows. Our Docker installation and application deployment guide explains images, containers and port mappings if these terms are new to you.
Install without exposing the first registration
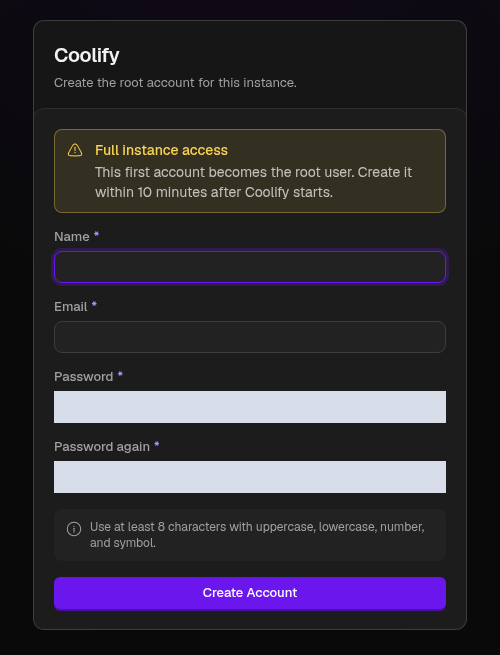
The first person to register becomes the instance owner and can manage connected servers. We will prepare the installation so that this page is reachable only through your SSH tunnel. This manual flow is for Ubuntu 24.04 amd64 and a new /data/coolify directory.
Prepare Docker and Compose
Connect to the VPS over SSH. If Docker is not already installed, add its official Ubuntu repository:
sudo -i
apt-get update
apt-get install -y ca-certificates curl git jq openssl
install -m 0755 -d /etc/apt/keyrings
curl -fsSL https://download.docker.com/linux/ubuntu/gpg -o /etc/apt/keyrings/docker.asc
chmod 0644 /etc/apt/keyrings/docker.asc
cat > /etc/apt/sources.list.d/docker.sources <<'EOF_DOCKER'
Types: deb
URIs: https://download.docker.com/linux/ubuntu
Suites: noble
Components: stable
Architectures: amd64
Signed-By: /etc/apt/keyrings/docker.asc
EOF_DOCKER
apt-get update
apt-get install -y docker-ce docker-ce-cli containerd.io docker-buildx-plugin docker-compose-plugin
systemctl enable --now docker
docker --version
docker compose version
The !override syntax requires Compose 2.24.4 or later. The test table records the versions actually used for this guide. See Docker’s Ubuntu installation documentation for more detail about the packages.
Download the reviewed Coolify sources
Do not continue in a directory that already contains an installation. On the clean server, create the working directories and download the official files:
umask 077
mkdir -p /data/coolify/{source,ssh/keys,ssh/mux,applications,databases,backups,services,proxy/dynamic,webhooks-during-maintenance,images}
cd /data/coolify/source
curl -fsSL https://raw.githubusercontent.com/coollabsio/coolify/7faa46bbd436f87e4b39c5ef5134d530d205d843/docker-compose.yml -o docker-compose.yml
curl -fsSL https://raw.githubusercontent.com/coollabsio/coolify/7faa46bbd436f87e4b39c5ef5134d530d205d843/docker-compose.prod.yml -o docker-compose.prod.yml
curl -fsSL https://raw.githubusercontent.com/coollabsio/coolify/7faa46bbd436f87e4b39c5ef5134d530d205d843/.env.production -o .env.production.example
curl -fsSL https://raw.githubusercontent.com/coollabsio/coolify/7faa46bbd436f87e4b39c5ef5134d530d205d843/scripts/upgrade.sh -o upgrade.sh
Check that the files match the sources reviewed for this guide. Every line should report OK:
sha256sum -c <<'EOF_HASHES'
2532ee9258e10ad4e86cb3c2b46c29fe9329f5a0dace0f7da410744feec279bd  docker-compose.yml
f8b104aadfca48d0033fdee6cb87fea13c68bc5c67c63ba18b1934e9f901ff5d  docker-compose.prod.yml
7895e54f7c9d40063e76afec9b35839048d91e5c3b5107d64ea49ef6987c304a  .env.production.example
a9ca9686e1b76b04b34995ae59f60aae3196774a84c23e46c8fcc74849d7fb44  upgrade.sh
EOF_HASHES
These URLs use a fixed upstream commit. All four files were verified as byte-for-byte matches for the sources used in the test installation. Stop if a hash differs. The next step selects Coolify 4.5.3; PostgreSQL and Redis major-version tags can resolve to newer images later, so review the official installation documentation when planning an upgrade.
Generate installation secrets
This block generates random passwords and an application key. It refuses to overwrite an existing .env and does not print the values:
python3 - <<'PY_ENV'
import base64, os, pathlib, secrets
os.umask(0o077)
root = pathlib.Path('/data/coolify/source')
values = {}
for raw_line in (root / '.env.production.example').read_text().splitlines():
    line = raw_line.strip()
    if line and not line.startswith('#'):
        name, value = line.split('=', 1)
        values[name] = value
values.update(
    APP_ID=secrets.token_hex(16),
    APP_KEY='base64:' + base64.b64encode(secrets.token_bytes(32)).decode(),
    DB_PASSWORD=secrets.token_urlsafe(48),
    REDIS_PASSWORD=secrets.token_urlsafe(48),
    PUSHER_APP_ID=secrets.token_hex(32),
    PUSHER_APP_KEY=secrets.token_hex(32),
    PUSHER_APP_SECRET=secrets.token_hex(32),
    LATEST_IMAGE='4.5.3',
    AUTOUPDATE='false',
)
with (root / '.env').open('x') as target:
    target.write(''.join(f'{name}={value}\n' for name, value in values.items()))
PY_ENV
Keep .env in a private backup location: the original APP_KEY is needed to recover Coolify’s encrypted credentials. The template’s ROOT_USER_* fields remain empty because you will create the owner in the interface. Automatic Coolify updates are disabled for this installation; plan upgrades with backups in place.
Prepare private management ports and the local SSH key
The custom Compose file binds the panel and terminal ports to the server’s loopback address. The separate SSH key lets Coolify manage this same server:
cat > /data/coolify/source/docker-compose.custom.yml <<'EOF_OVERRIDE'
services:
  coolify:
    ports: !override
      - "127.0.0.1:8000:8080"
      - "127.0.0.1:6001:6001"
      - "127.0.0.1:6002:6002"
EOF_OVERRIDE

install -m 0700 -d /root/.ssh
ssh-keygen -q -t ed25519 -N '' -C root@coolify \
  -f /data/coolify/ssh/keys/[email protected]
printf '\n' >> /root/.ssh/authorized_keys
cat /data/coolify/ssh/keys/[email protected] >> /root/.ssh/authorized_keys
chmod 0600 /root/.ssh/authorized_keys
chown -R 9999:root /data/coolify
chmod -R 0700 /data/coolify
chmod 0600 /data/coolify/source/.env /data/coolify/ssh/keys/*
docker network create --attachable coolify
Generate the key once. The append keeps existing authorized_keys content; the server must permit root access using an SSH key.
Open an SSH tunnel from your computer
Run this command in a new terminal on your own computer, replacing 203.0.113.10 with the VPS address. Keep that terminal open:
ssh -N -L 127.0.0.1:8000:127.0.0.1:8000 -L 127.0.0.1:6001:127.0.0.1:6001 -L 127.0.0.1:6002:127.0.0.1:6002 [email protected]
If port 8000 is already in use on your computer, change only the first local port, for example to -L 127.0.0.1:18000:127.0.0.1:8000. Then use http://localhost:18000 in the browser.
Start Coolify and create the owner account
Return to the VPS terminal. Check the Compose configuration, pull the images and start with the same set of files:
cd /data/coolify/source
docker compose --project-name coolify --env-file .env \
  -f docker-compose.yml -f docker-compose.prod.yml -f docker-compose.custom.yml config --quiet

docker compose --project-name coolify --env-file .env \
  -f docker-compose.yml -f docker-compose.prod.yml -f docker-compose.custom.yml pull

docker compose --project-name coolify --env-file .env \
  -f docker-compose.yml -f docker-compose.prod.yml -f docker-compose.custom.yml \
  up -d --no-build --pull never

docker ps --format 'table {{.Names}}\t{{.Status}}\t{{.Ports}}'
Wait until docker ps reports coolify as healthy. On the first start, an HTTP page can respond before application initialization finishes. Our test initially showed Setup window closed; registration opened after initialization completed. That first message alone does not mean the registration period has expired.
Refresh http://localhost:8000 on the computer running the tunnel and create the owner. The first-registration window lasts 10 minutes after initialization. If that window has expired, restart the new coolify container and retry through the same protected tunnel. After creating the owner, we confirmed on the login screen that public registration was disabled.
The management ports remained bound to 127.0.0.1 in the test. Probes from a separate server could not connect to ports 8000, 6001 or 6002.
Validate the server and create your first project
In this guide, Coolify and the app run on the same machine. Server validation checks whether Coolify can connect to that machine and carry out Docker operations. Resolve a failed validation before moving on: the same connection problem can prevent deployments from working.
- Choose Continue on first login.
- Select This machine for the deployment server. This uses the VPS running Coolify.
- Choose Create “My First Project”.
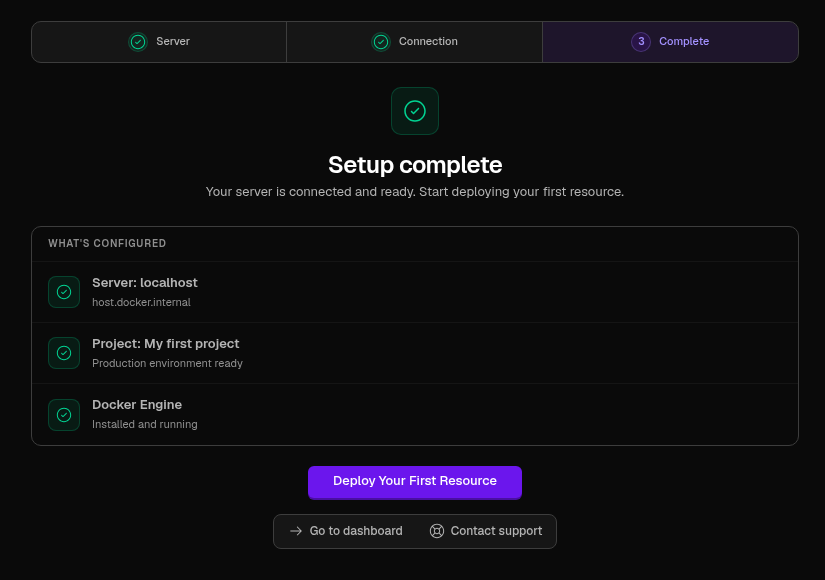
- On Setup complete, check
localhost,My first projectand the readyproductionenvironment. - Confirm that
localhostappears as Ready on the dashboard.
These steps completed on the test VPS. Here, localhost means the VPS itself, not your own computer.
Give the management panel an HTTPS domain
Point the panel subdomain’s DNS record to the VPS, then open Settings → General → URL and enter https://coolify.example.com. Keep Redirect HTTP to HTTPS enabled and choose Save changes. Open the panel through this HTTPS address while retaining the direct management ports on loopback.
The test panel used https://docs-coolify.fibacloud.com. HTTPS passed normal certificate verification, and the panel’s realtime connection received WebSocket messages. Reopening the old tunnel tab through the new domain also gives the interface the correct HTTPS address.
A project organizes resources that belong together. It does not increase the server’s capacity. Use names you can recognize later in deployment logs and backup records.
Prepare the Dockerfile application
Open the new-resource screen inside My first project → production. Choose Deploy on the Dockerfile card, paste the complete file into the editor and select Create Application.
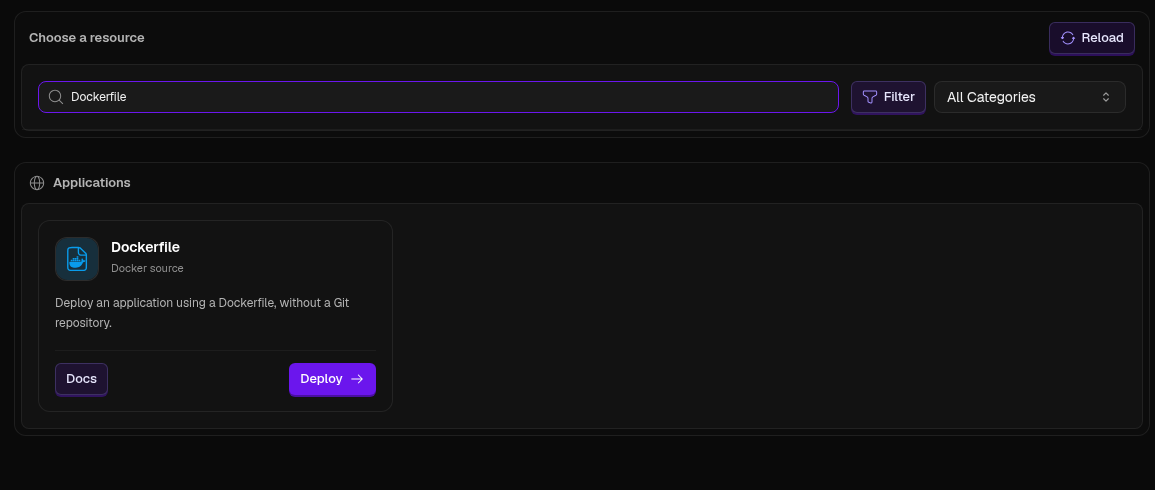
Coolify’s Dockerfile-without-Git workflow has no repository build context. A COPY instruction cannot read an application file that exists only on your laptop. The example therefore creates its code and runtime configuration within one self-contained Dockerfile.
Download the example Dockerfile and paste its complete contents into Coolify’s Dockerfile field. If you want to use the downloaded text file for a local Docker build, save it as Dockerfile. It contains no credentials or external service connection.
To download it from the command line and check its hash:
curl -fL https://www.fibacloud.com/community/tutorials/wp-content/uploads/2026/10/fibacloud-coolify-20261031/coolify-demo.txt -o Dockerfile
sha256sum Dockerfile
Expected SHA-256: 420cbca2aa3ed790c41c7a6ca5d85e294a1c750b8d3100296f3af63d37c20392. Paste the complete downloaded file into Coolify. The excerpt below only shows the key runtime settings; it is not a complete Dockerfile:
FROM python:3.13-alpine@sha256:7984cf56ceaddebe4fefeb75d64000b9f45d8b77b11a09b24524da6cdc3af0c8
ENV PYTHONDONTWRITEBYTECODE=1 PYTHONUNBUFFERED=1 RELEASE=v1
USER 10001:10001
EXPOSE 8080
HEALTHCHECK --interval=15s --timeout=3s --start-period=10s --retries=3 CMD ["python", "-c", "import urllib.request; urllib.request.urlopen('http://127.0.0.1:8080/health', timeout=2).read()"]
CMD ["python", "/app/server.py"]
This small learning application uses Python’s standard library. For your own customer application, choose your framework’s production server and required dependencies. The example needs no package repository, pip installation or Git connection.
This file built in the Coolify deployment. The running application was verified to use Python 3.13.18, UID/GID 10001:10001 and the expected application source.
The process must listen on 0.0.0.0 inside the container. A process that only listens on 127.0.0.1 cannot accept the proxy’s incoming connection. The application’s internal port must also match the port configured in Coolify.
Prepare these values before the first deployment:
| Setting | Value | Purpose |
|---|---|---|
| Internal application port | 8080 |
The Python process listens here and the proxy connects to it. |
| Environment variable | RELEASE=v1 |
Shown on the Release card in the browser. Use the runtime scope. |
| Persistent storage | Named volume → /app/data |
Keeps the application’s identity and startup count in state.json. |
| Replicas | One | The example tracks starts of a single application process. |
The Dockerfile prepares /app/data for UID/GID 10001:10001 and runs the application as that user. Choose a named volume for this first deployment. A bind mount connects an existing host directory instead; its ownership needs separate attention.
Add the persistent volume before deploying
- Open Persistent Storage → Add Mount → Volume mount for the app.
- Set Name to
docs-demo-dataand Destination Path to/app/data. - Choose Add Volume and check that the volume appears in the list.
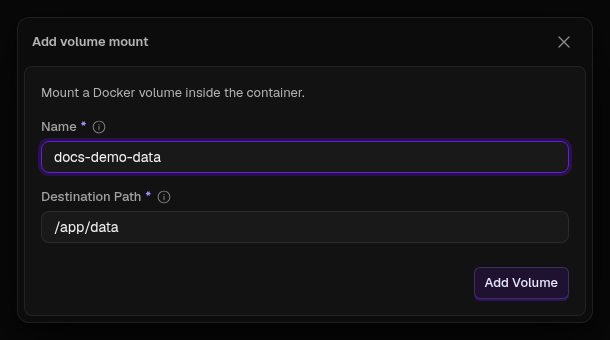
After the first deployment, the named volume was confirmed at /app/data. The directory belonged to 10001:10001 with mode 0750; the state file used mode 0600.
Add the first runtime variable
- Open Environment Variables → Add.
- Enter
RELEASEas Name andv1as Value. - Set Build time to Not available during build and Runtime to Available in the container.
- Choose Add Variable.
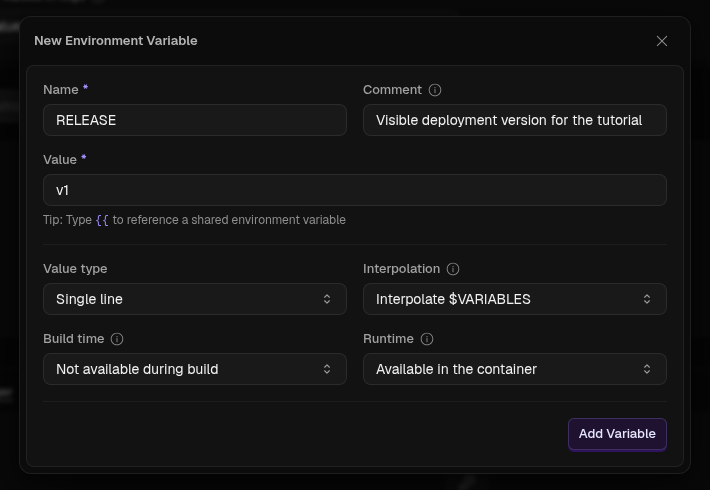
Environment variables can be available during a build, at runtime or in both places. A value used only by the running process belongs in the runtime scope; disable build availability when it is unnecessary. A masked field in a dashboard does not mean a value cannot leave traces in a build or image.
Configure your domain and HTTPS
Point the application domain’s A record to the VPS’s public IP. In this test, docs-coolify-app.fibacloud.com resolved directly to 103.83.87.127. For your own domain, use DNS only at your DNS provider and also check any AAAA record.
- Open the application’s Domains page.
- Select the Settings gear on the generated domain’s row.
- Set Protocol to
https, Domain toapp.example.comand Port to8080. Do not repeat the protocol in Domain; leave Path empty for this example. - Choose Save in the dialog.
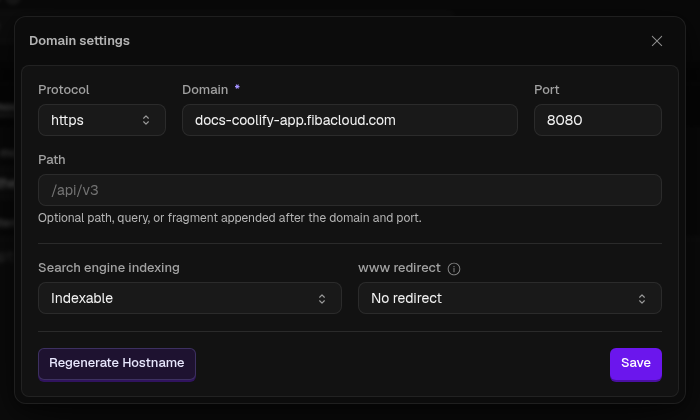
The dialog’s Save persists the domain directly. Reloading the page confirmed DNS matches, internal port 8080 and the HTTP → HTTPS redirect. Port is the proxy’s internal destination; visitors use the normal HTTPS port 443.
With the domain configured, proceed to the first deployment. Check the certificate and application response once that deployment finishes.
Deploy and check the application’s health
Before deploying, open the application’s Healthcheck page. The screen should show Dockerfile HEALTHCHECK in use; leave Enable off. The current interface says that enabling this extra check replaces the Dockerfile check.
Choose Deploy at the top and open Deployment Logs. The first deployment reached Finished, and the app showed Running. Its log confirmed use of the Dockerfile health check and a healthy replacement container. This small example’s first deployment took 1 minute 24 seconds; your own application’s build time may differ.
A successful image build alone does not prove that the application is reachable. The process must run, the proxy must reach the right port and the health check must pass. Seeing the release value in the browser and the expected response from /health completes the functional check for this example.
The Dockerfile defines the health check in its HEALTHCHECK instruction. Python requests http://127.0.0.1:8080/health from inside the container, so this example needs neither curl nor wget. This guide leaves the extra dashboard check disabled; the running container was verified to use this Python command.
/health returns {"status":"ok"} when the state file exists and its directory is writable. /api/status returns the release, persistent identity and startup count as JSON.
After deployment, open the domain in a browser. Then run these checks with your own domain:
curl -I http://app.example.com/
curl --fail --show-error https://app.example.com/health
curl --fail --show-error https://app.example.com/api/status
The application opened at https://docs-coolify-app.fibacloud.com with a verified Let’s Encrypt certificate and TLS 1.3. HTTP redirected to HTTPS with status 302; /health returned 200 and {"status":"ok"}. The first status response showed release: v1 and start_count: 1. Repeating page, status and health requests did not change that count.
The application container has no host port mapping; requests arrive through the proxy. Obtaining the first certificate does not establish that future automatic renewal has also been tested. HTTPS does not add an application login system.
A health check does not test every application feature. This example checks a lightweight endpoint that does not write data. Its requests therefore do not change the startup counter we will compare later.
Change a runtime variable and redeploy
Note the release value from the first successful deployment. Change the application’s environment variable in Coolify, save it and redeploy to apply the new environment to the running app. Saving a form does not by itself change the environment of an existing process.
Change RELEASE from v1 to v2. When the successful redeployment finishes, check the Release card and the /api/status response again.
- Edit
RELEASEin Environment Variables. - Set Value to
v2, retain the build/runtime scope and choose Update Variable. - Use Redeploy at the top and wait for Finished in Deployment Logs.
The redeployment created a new container and removed the old one. The HTTPS response changed to v2 and the app reached a healthy state. The first two health checks in this deployment timed out; the third passed. Read the final deployment state alongside the health log instead of treating one temporary result as the outcome.
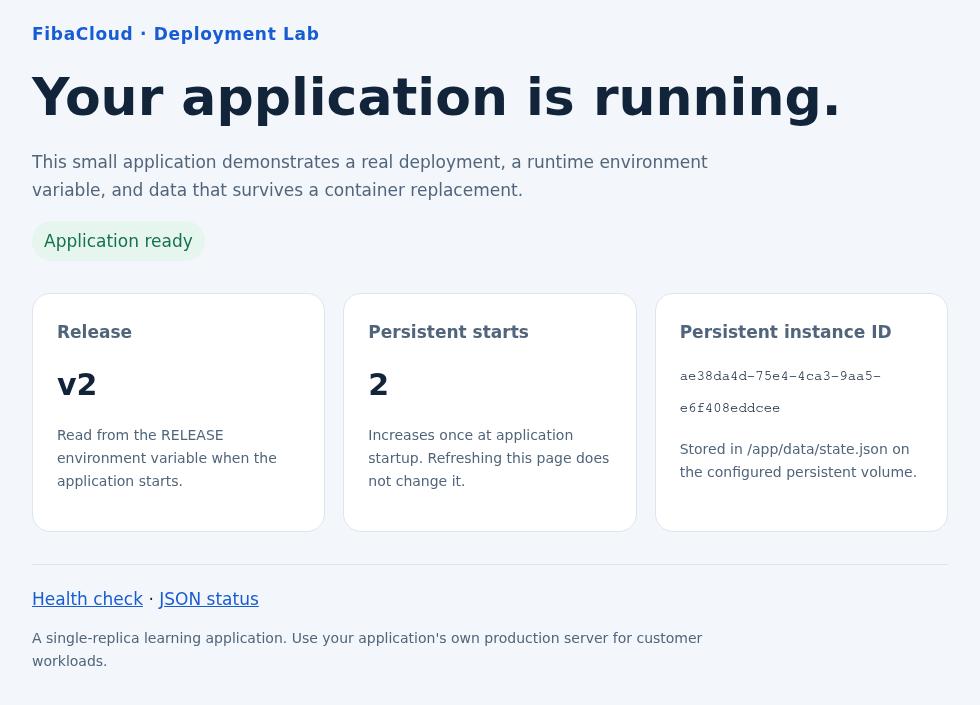
This example reads its variable at runtime. An application that consumes configuration during a build may need a new image. Keep secret keys out of Dockerfiles, public repositories and tutorial screenshots.
Verify that data survives container replacement
A container’s writable filesystem can disappear when the container is removed and recreated. Files that need to survive must be written to persistent storage. Here, the application stores its identity and startup count under /app/data.
The named volume you configured before the first deployment must mount at the same destination in the replacement container. Refreshing the page does not increase the count; it changes when the application process starts. A restart or deployment that starts the process more than once can increase the count by more than one.
The test retained the complete application identity and the same named volume. The table shows the first eight characters of the identity for readability:
| Check | First deployment | Redeployment |
|---|---|---|
release |
v1 |
v2 |
| Persistent identity prefix | ae38da4d |
ae38da4d |
start_count |
1 |
2 |
| Container | First container | New container; old one removed |
| Repeated page/health requests | Count unchanged | Count unchanged |
This check shows that the data survived a replacement container. If the server disk fails, a volume on that disk is affected too. Accidental deletion and corrupted data need a separate backup and recovery plan.
Back up Coolify and the application separately
Coolify’s backup and an application’s backup protect different things. Restoring the panel’s projects and settings does not automatically restore the files those applications need.
| What to protect | What it contains | How to handle it |
|---|---|---|
| Coolify database backup | Control-plane records such as projects, resources, settings and history. | Check the backup job’s result and retain an independent copy of the file. |
| Installation secrets and server access | The original APP_KEY in /data/coolify/source/.env, plus the SSH keys and authorization needed for your recovery scenario. |
Do not assume the database dump includes them. Store them in an encrypted backup location with restricted access. |
| Application volume or database | The application’s own files and records. | Take a consistent backup suitable for the app and test it by restoring to a separate destination. |
Create the panel database backup
- Open Settings → Backup.
- On first use, choose Configure Backup.
- Check Frequency, Timezone and retention. The default schedule created in this test was
0 0 * * *inUTC, meaning every day at 00:00 UTC. - Choose Back Up Now.
- Wait for Success in Executions, then use Download backup to save a copy outside the server.

The manually triggered backup succeeded on 31 October 2026 at 19:09:18 UTC. The downloaded file contained 563,403 bytes. Local identifies local storage; no separate S3 destination was configured for this test.
Restore the panel database on the same server
This restores the panel database to its state at the time of the backup. The test used the same server and Coolify version; .env, the original APP_KEY and SSH files stayed unchanged. Encrypted backup copies were also retained outside the VPS.
Prepare a private recovery directory first. Use a new directory and preserve any existing backups:
umask 077
install -d -m 0700 /root/coolify-recovery
Place the downloaded dump with its verified hash at /root/coolify-recovery/instance.dmp. Then check that the archive is readable and take a separate backup of the current database before restoring:
docker exec -i coolify-db pg_restore --list \
  < /root/coolify-recovery/instance.dmp \
  > /root/coolify-recovery/instance.list

docker exec coolify-db pg_dump \
  --username=coolify --dbname=coolify --format=custom \
  > /root/coolify-recovery/before-restore.dmp
Check each command’s success before continuing. First stop only the panel and Redis containers:
docker stop coolify coolify-redis
Restore the selected dump. --clean replaces the current panel database objects with the backed-up state:
docker exec -i coolify-db pg_restore \
  --clean --if-exists --exit-on-error --no-acl --no-owner \
  --username=coolify --dbname=coolify \
  < /root/coolify-recovery/instance.dmp
Restart the same containers only after restoration completes without errors. If it fails, leave the panel stopped while investigating:
docker start coolify-redis coolify
Once the panel is healthy, log in with a fresh browser session and check your project and application. Use Servers → localhost → Revalidate Connection to check server access too.
In the test, an empty check project created after the backup disappeared after restoration; the original project and application returned. Fresh login and server revalidation succeeded. The application, proxy and PostgreSQL were not restarted: before, during and after the panel outage, the app returned v2, the same identity and start_count: 2. This verifies panel database recovery on the same server.
Back up and restore the example application’s volume
This section applies only to state.json and .state.lock in this guide’s /app/data volume. Use database-native consistent backup tools for workloads such as PostgreSQL or MySQL instead of applying this file-copy procedure to a running database.
Find this application’s container in docker ps on the server and replace YOUR_APP_CONTAINER with its name. The following commands select only a named volume mounted at /app/data:
docker ps --format 'table {{.Names}}\t{{.Status}}'
FIBA_APP_CONTAINER='YOUR_APP_CONTAINER'
FIBA_APP_VOLUME="$(docker inspect --format '{{range .Mounts}}{{if and (eq .Type "volume") (eq .Destination "/app/data")}}{{.Name}}{{end}}{{end}}' "$FIBA_APP_CONTAINER")" || exit 1
test -n "$FIBA_APP_VOLUME" || exit 1
FIBA_APP_DATA="$(docker volume inspect --format '{{.Mountpoint}}' "$FIBA_APP_VOLUME")" || exit 1
test -d "$FIBA_APP_DATA" || exit 1
Stop the application and verify that no running container is using its volume. Preserve any existing app-volume.tgz in a separate private location before creating this two-file backup:
umask 077
install -d -m 0700 /root/coolify-recovery
test ! -e /root/coolify-recovery/app-volume.tgz || exit 1
test ! -L /root/coolify-recovery/app-volume.tgz || exit 1
docker stop "$FIBA_APP_CONTAINER" || exit 1
FIBA_APP_WRITERS="$(docker ps -q --filter "volume=$FIBA_APP_VOLUME")" || exit 1
test -z "$FIBA_APP_WRITERS" || exit 1

tar --numeric-owner -C "$FIBA_APP_DATA" \
  -czf /root/coolify-recovery/app-volume.tgz \
  state.json .state.lock || exit 1
sha256sum /root/coolify-recovery/app-volume.tgz
After the backup command succeeds, retain an encrypted copy outside the VPS. To verify it, decrypt that copy in a private location and compare the decrypted archive’s SHA-256 with the value recorded for the original archive. You can then start the application again:
docker start "$FIBA_APP_CONTAINER"
When restoring, select the current application container and volume again. Stop the app and inspect the archive. Its SHA-256 must match the value recorded for the original archive, and it must contain only regular files named state.json and .state.lock:
docker stop "$FIBA_APP_CONTAINER" || exit 1
FIBA_APP_WRITERS="$(docker ps -q --filter "volume=$FIBA_APP_VOLUME")" || exit 1
test -z "$FIBA_APP_WRITERS" || exit 1
sha256sum /root/coolify-recovery/app-volume.tgz
tar -tvzf /root/coolify-recovery/app-volume.tgz
After those checks pass, restore the two files with their ownership and permissions:
tar --numeric-owner --same-owner --same-permissions \
  -xzf /root/coolify-recovery/app-volume.tgz \
  -C "$FIBA_APP_DATA"
Once restoration succeeds, start the app with docker start "$FIBA_APP_CONTAINER". Wait for a healthy state and check /api/status over HTTPS.
The test backup contained identity ae38da4d… and count 2. To distinguish restoration from a restart, the data was deliberately changed to another identity and a displayed count of 9001. Restoring the backup returned the complete original identity; the subsequent application start increased the restored count to 3. RELEASE=v2 stayed configured because it comes from runtime settings, not the volume file. Repeated requests kept the count at 3; UID/GID 10001:10001, directory mode 0750 and state-file mode 0600 were verified.
The earlier application screenshot shows count 2 at the redeployment stage. The post-restore measurement was 3. This second exercise recovered the stopped application volume on the same server; the control-plane database and other containers were unchanged.
Do not leave your only backup on the same VPS. Record the Coolify version associated with the backup. Recovery onto another machine needs the original APP_KEY and suitable SSH access; blindly replacing the entire new installation’s .env can leave other service passwords inconsistent.
Starting a second Coolify controller with keys that still operate the live server can allow both controllers to change the same resources. The recovery checks performed for this guide are described above. Plan a full server migration separately using the official instance restore procedure.
Troubleshoot the first deployment
| Symptom | First check |
|---|---|
| The panel does not open at the public IP on port 8000 | That is expected with this guide’s loopback binding. Check the SSH tunnel and the local browser URL. |
| The domain points elsewhere or a certificate cannot be issued | Check A and any AAAA records, access to 80/443 and other services already using those ports. |
| The deployment completed but the app is unreachable | Compare the process log, 0.0.0.0 listening address and internal application port. |
| The application is unhealthy | Check the health-check path and that its command exists inside the container. Find the failing response instead of simply disabling the check. |
| The panel reports “Cannot connect to real-time service” | Check the saved HTTPS panel URL and WebSocket connection through the proxy, then reopen the correct domain. This setup does not publish 6001/6002 directly. |
| The new environment variable is missing | Check build/runtime scope and whether the deployment which applies the change completed. |
| Data cannot be written or disappears after deployment | Check the mount destination, the runtime user’s write permissions and the directory the app actually writes to. |
Use this table to narrow a problem down; a symptom can have more than one cause. Inspect the latest failed deployment’s log and avoid posting output that contains credentials or keys in a public support thread.
What to maintain after the first deployment
Before adding another app, record its domain, required variables, persistent directories and health check. Review release notes and backups before an update. Afterwards, check the application response, health status and data access again.
For an automation application, see our n8n installation guide with Docker Compose and HTTPS. That article uses its own Compose configuration; it is not a Coolify template to paste into this Dockerfile field.
Frequently asked questions
Is Coolify free?
The self-hosted version of Coolify is free to run on your own server. Account separately for the VPS, domain, storage and external services. Managed Coolify Cloud is a different offering; distinguish the software from infrastructure costs when comparing a provider’s current plans.
Do I need a Git account for this guide?
No. The example enters a Dockerfile directly into Coolify. This guide does not configure automatic deployment from a repository.
Can I use an existing cPanel or Plesk server?
This guide uses a clean, separate VPS. Review port ownership, web services and Docker configuration before considering the same machine for an existing hosting panel.
Does a persistent volume replace a backup?
No. A volume separates data from the container’s lifetime. Server loss and accidental deletion still need independent copies and a tested recovery path.
Does Coolify remove the need to understand Docker?
The interface simplifies routine operations, but you still need to know an app’s port, persistent directory, build requirements and logs. Those details are also the starting point for troubleshooting a failed deployment.
Leave a Reply