FibaCloud
Skip to content
Ask a question

Press ESC to close

Install WordPress on an Ubuntu 24.04 VPS

Running WordPress on a VPS means managing its web server, PHP runtime, database, HTTPS and ongoing maintenance together. This guide targets a new Ubuntu 24.04 LTS server with Apache 2.4, PHP 8.3 and an existing MySQL 8.4 LTS installation. Do not apply it over a control-panel installation or an existing website.
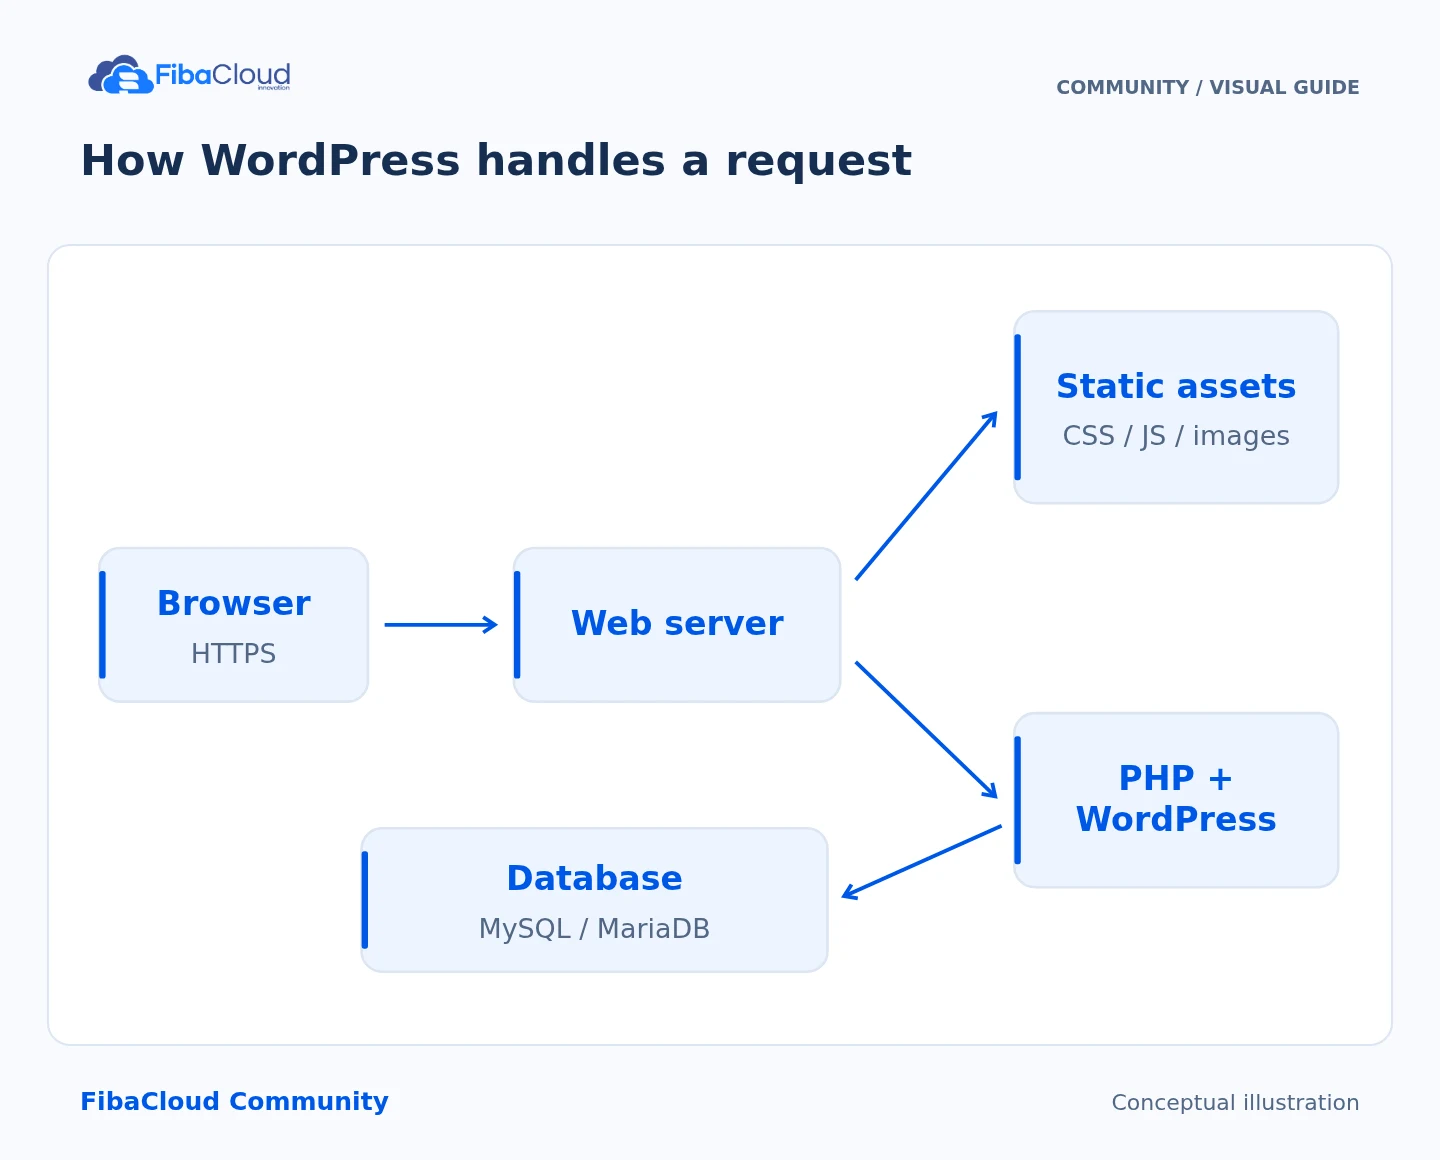
How WordPress handles a request
How WordPress handles a request The web server can serve static files directly. For dynamic requests, PHP runs WordPress; WordPress reads the database as needed and builds the response.
Step-by-step explanation
  1. Receive: The web server accepts HTTPS requests.
  2. Route: Serve static assets directly.
  3. Execute: Run PHP/WordPress for dynamic content.
  4. Query: Read the data needed from the database.

Prerequisites and deployment model

Prepare a sudo-capable user, a domain you control, DNS access and a separate test environment. Replace site.example.com consistently with your own hostname. WordPress recommends PHP 8.3 or later, MySQL 8.0 or later or MariaDB 10.11 or later, and HTTPS. This article uses MySQL rather than mixing commands for both database products.

First complete the version and package-origin checks in the MySQL installation guide for Ubuntu. This workflow requires a working MySQL 8.4 server; it does not assume Ubuntu’s mysql-server package automatically provides 8.4 and does not replace an existing database package.

The deployment account manages code; Apache writes only to the media upload directory. Core, plugin and theme updates use a controlled deployment process. A different model that permits dashboard installation and updates needs its own permission design and security-update ownership.

Complete package, service, public TLS, WordPress installation and restore acceptance checks on a matching test server. The checklist below is not a claim that this complete environment has already been executed and certified.
1. Prepare the server and packages

cat /etc/os-release
sudo ss -ltnp '( sport = :80 or sport = :443 or sport = :3306 )'
sudo apt update
sudo apt install apache2 libapache2-mod-php8.3 php8.3-mysql php8.3-curl php8.3-gd php8.3-mbstring php8.3-xml php8.3-zip curl
php -v
php -m
mysql --version
mysql -u root -p --execute="SELECT VERSION();"

If another application owns these ports, review its configuration first. Keep MySQL off the public internet. The application connects to a database on the same server, so neither disabling the firewall nor exposing port 3306 is required.

2. Configure HTTPS before installing WordPress

Create the new document root:

sudo install -d -o "$(id -u)" -g "$(id -g)" -m 0755 /var/www/fc-wordpress/public
printf '%s\n' 'TLS preparation' > /var/www/fc-wordpress/public/index.html
sudo a2enmod rewrite

Create /etc/apache2/sites-available/fc-wordpress.conf with the following virtual host. Inspect an existing file with that name before changing it.

<VirtualHost *:80>
    ServerName site.example.com
    DocumentRoot /var/www/fc-wordpress/public
    <Directory /var/www/fc-wordpress/public>
        Options -Indexes +FollowSymLinks
        AllowOverride FileInfo
        Require all granted
    </Directory>
    <Directory /var/www/fc-wordpress/public/wp-content/uploads>
        <FilesMatch "\.php$">
            Require all denied
        </FilesMatch>
    </Directory>
    <Files "wp-config.php">
        Require all denied
    </Files>
    ErrorLog ${APACHE_LOG_DIR}/fc-wordpress-error.log
    CustomLog ${APACHE_LOG_DIR}/fc-wordpress-access.log combined
</VirtualHost>
sudo a2ensite fc-wordpress.conf
sudo apache2ctl configtest
sudo systemctl reload apache2
sudo apt install certbot python3-certbot-apache
sudo certbot --apache -d site.example.com
sudo certbot renew --dry-run

Reload only after Syntax OK. DNS and your certificate validation method must be ready. Verify HTTPS and HTTP redirection using the actual hostname before creating administrator credentials. Check for unwanted AAAA records as well.

3. Create a separate database and account

Use the administrator password configured during Oracle MySQL installation; never give WordPress the root account. -p prompts interactively. Use sudo mysql only if you have confirmed that this account actually uses socket authentication:

env MYSQL_HISTFILE=/dev/null mysql -u root -p

Replace the password placeholder with a strong, unique password generated locally. If the example names already exist, choose new ones instead of deleting existing data.

CREATE DATABASE fc_wordpress CHARACTER SET utf8mb4 COLLATE utf8mb4_unicode_ci;
CREATE USER 'fc_wp'@'localhost' IDENTIFIED BY 'REPLACE_WITH_A_UNIQUE_PASSWORD';
GRANT ALL PRIVILEGES ON fc_wordpress.* TO 'fc_wp'@'localhost';
SHOW GRANTS FOR 'fc_wp'@'localhost';
EXIT;

Privileges apply only to the WordPress schema: there is no global *.* grant, access to another schema or GRANT OPTION. Because core and plugin updates can create and alter tables, this account acts as the application’s schema owner. Separate a narrower runtime account only after testing the application’s and updater’s actual requirements. Keep passwords out of command-line arguments, Git and public files.

4. Download WordPress from its official source

In a new working directory:

mkdir -p fc-wordpress-download
cd fc-wordpress-download
curl --fail --location --proto '=https' --tlsv1.2 https://wordpress.org/latest.tar.gz -o wordpress.tar.gz
sha256sum wordpress.tar.gz > wordpress-download.sha256
tar --no-same-owner -xzf wordpress.tar.gz
php -r 'include "wordpress/wp-includes/version.php"; echo $wp_version, PHP_EOL;'
sudo cp -a wordpress/. /var/www/fc-wordpress/public/

Record the version and archive hash in your maintenance notes. A local hash identifies the downloaded file; it is not independent signature verification. Use the official HTTPS source and test the selected version with your plugins and theme.

Copy wp-config-sample.php to wp-config.php in the document root. Set the database to fc_wordpress, user to fc_wp, host to localhost, and enter your own password. Obtain unique authentication keys and salts from WordPress’s official salt generator rather than copying published secrets from an example.

Before the “stop editing” line, add the following policy settings without defining any existing constant twice:

define( 'DISALLOW_FILE_EDIT', true );
define( 'DISALLOW_FILE_MODS', true );
define( 'FORCE_SSL_ADMIN', true );

DISALLOW_FILE_MODS disables dashboard plugin/theme installation and automatic file updates. In this model, the deployment account must apply security updates promptly after testing. Read-only code is not a reason to leave software unpatched.

5. Limit filesystem permissions

sudo chown -R "$(id -un)":www-data /var/www/fc-wordpress/public
sudo find /var/www/fc-wordpress/public -type d -exec chmod 0750 {} \;
sudo find /var/www/fc-wordpress/public -type f -exec chmod 0640 {} \;
sudo install -d -o www-data -g www-data -m 0750 /var/www/fc-wordpress/public/wp-content/uploads

Apply this only to the new example site. Do not change permission trees belonging to other websites or a control panel. Grant access to any additional cache directory according to the plugin’s documentation instead of making all code writable by the web account.

For permalinks, save the .htaccess rules provided by WordPress using the deployment account. Since the code tree is read-only to Apache, do not expect WordPress to write that file automatically. Confirm that the rules affect only this site. Remove the temporary index.html preparation page afterwards; retain the application’s index.php.

6. Install and verify the application

Open the installation wizard over HTTPS. Choose a unique administrator account and strong password, adding multifactor authentication where appropriate. Verify that the site’s configured URL uses HTTPS.

Using a test account, check login, publishing a post, media uploads, permalinks, password-reset email delivery and required plugin functions. Review Site Health. Verify that /wp-config.php, archives and SQL backups are not public and that missing pages return 404. Remove test-environment indexing restrictions only when the real public site is ready.

Backups, updates and troubleshooting

A backup must cover the database, wp-content and required configuration together. Protect secrets and store backups outside the document root. Restore into a separate database and hostname, preventing the copy from sending real email or triggering payments. Verify content, media and login before considering the backup usable.

Database connection error: check the service, localhost, credentials and schema privileges. Internal pages return 404: check rewrite support, .htaccess and AllowOverride FileInfo. Uploads fail: inspect the uploads directory’s ownership and write boundary. 500 or blank page: inspect PHP and Apache logs without exposing detailed errors to visitors.

Before updates, capture a consistent files/database backup and rehearse the release in staging. Rollback needs matching application files and compatible database state. Dropping and reinstalling the live database is not a troubleshooting step.

Official references

Technical content and sources reviewed on October 4, 2026. Recheck the relevant official documentation when a version or provider changes.

Leave a Reply

Your email address will not be published. Required fields are marked *